Learn how to prevent and solve 6 common issues you may encounter with your knitting.
"Stuff happens" to every machine knitter. Learning to overcome these challenges will go a long way to prevent frustration with your machine.
Fill out the form and get immediate access to the FREE 6-Point Guide
Enter your email for immediate access to a FREE 6-POINT GUIDE Prevent and Solve Machine Knitting Headaches
Has this happened to you?
You are knitting away happily, soothed by the rhythm of the carriage or lock moving
back and forth, watching the fabric grow, when suddenly, the tension arm springs
back, and your work drops either completely or partially from the machine.
You can’t get the machine to knit that first row, no matter how hard you try.
You just can’t get the carriage/lock to move.
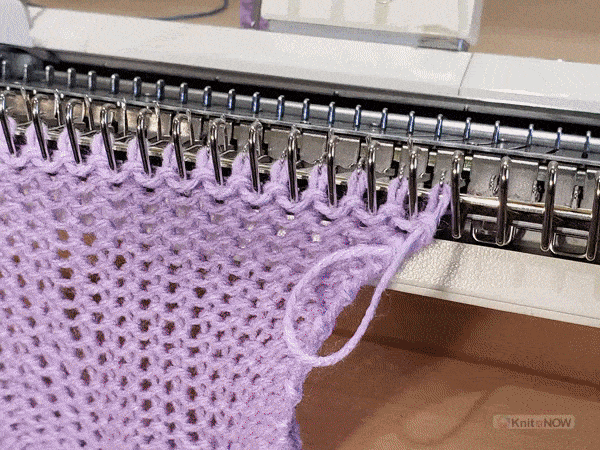
You are knitting happily again when you realize that one (or more) needles are not
knitting. They are moving up and down but there is no stitch.
You notice a stitch immediately jumping off its needle, or notice a section of bars
(unknit stitches).
You discover loops of yarn at the end of each row.
Avoid these headaches Fill out the form and get immediate access to the FREE 6-Point Guide
The final solution for jamming is YOU! If any of these things happen to you, the first thing that you should do is take a break. The machine is not going to do
anything while you are taking the break.
When the work falls off the machine, it is usually due to something that you forgot to
do. Check the following:
Make sure that the yarn was in the feeder correctly (with the Gate properly closed, if applicable).
Is the yarn trapped by the gate? Let go of the end and see if it springs back. If it
doesn’t, it is trapped and you need to free it by rethreading it into the gate.
PASSAP knitters may find that a knot or thick spot in the yarn has caused it to stick
in the tensioner, causing the yarn to break.
Did you remember to check that all of the needles were in normal working position
when you were making a Free Pass ?
When you change yarns, do you remember to hold the yarn below the needle bed
either by hand or with a clip on the end of the yarn?
Did you run out of yarn?
This happens to even the most experienced knitters . . . you aren't alone
You are using the correct weight of yarn for your machine
You have threaded the machine correctly for the cast on that you are using.
If you are using a cast on such as the e-Wrap or the crochet/chain Cast On , that you have
not put the yarn around the needles too snugly. There needs to be some ease, so use
a light touch when doing these cast ons.
You have anchored the yarn in the feeder gate with a clip or light weight.
If the carriage will not move at all, no matter how much you try, stop trying. DO NOT
try to force the carriage as you may cause damage to the carriage or to the needles.
Single bed knitters:
Remove the yarn from the carriage and fasten it at the end of the needle bed.
Carefully remove the sinker plate and check it for yarn tangled around the brushes.
If so, remove the tangled yarn and replace the sinker plate.
Release the carriage according to the directions from your manufacturer and
remove the carriage from the machine.
Then check the needles as indicated below.
Passap knitters:
Set the lock to GX/GX.
Remove the strippers.
Slowly move the carriage to the side.
Then check the needles as indicated below.
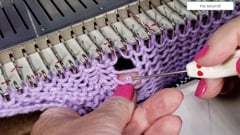
Check the needles:
After carefully removing the carriage you will see that the needles are all in different positions. Examine the position of the stitches on the needles and re-position them if needed so they knit correctly on the next row.
Needles that still have a stitch
IN THE HOOK (or on top of the latch) can be pushed back into working position.
Needles with the stitch BEHIND THE LATCH will need to be reset. Use the transfer tool to push the needle down towards
the stitch until the stitch slides onto the transfer tool, pull the needle up until the stitch
drops from the transfer tool into the hook of the needle.
As you reset the stitches, check each needle:
Make sure that it does not have a broken latch
The needle is still straight
The hook is still present
If the needle is damaged, it will need to be replaced.
Your yarn may have knots where it was joined during the manufacturing process and these may be causing problems.
Once you have the problem solved:
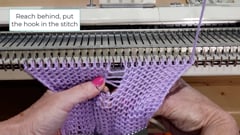
Unknit (rip out) one row:
Unthread the carriage
Stitch by stitch, pull up on the working yarn until the stitch from the row below is in the hook
Make sure all the stitches remain in the hooks (not behind the latches)
Free Pass so the carriage is on the on the same side as the yarn
Rethread the carriage
Don’t forget to
set your counter back one row if you tripped it.
If a needle is rising with the carriage pass but not forming a stitch, check for a
damaged needle.
It may have a broken latch or hook, or it may be bent. It is easier to
replace the needle than to attempt to straighten it. If you have a new machine, you
should have received some spare needles with it when it was purchased. You can also
obtain needles from the machine manufacturer or online sales sites. Make sure that
they are the right size for your machine.
Replace a needle with knitting in work
If you have a manual for your machine, follow its instructions. You do not need to
remove the work from the machine.
Do the following:
Transfer the stitch on the damaged needle to its neighbor.
Remove the needle retaining bar only as far as the damaged needle.
If the needle still has a latch, close it. If not, you will need a pair of wire cutting
pliers or a wire cutter to cut the head off the needle. This is especially important for
the PASSAP as it has a spring that a damaged needle could hook.
Push down on the front of the needle, and the shank and butt of the needle will rise.
Pull the needle out of its channel.
Place a new needle into the channel, inserting it with the latch open. Replace the
needle retaining bar and transfer the stitch back onto the needle.
If the broken needle was not noticed immediately, latch up the rows that were knit
until you have the correct number of rows on the new needle
You may be taking the knitting too far past the needles in working position. Clear
the end needles by 1”/1-2 cm only.
You may be knitting too fast. Slow down so the machine can do its work.
Your tension discs on the yarn mast may not be properly adjusted. If they are too
loose, they could cause looping.
You may have left weaving or tuck brushes in operation.
Single bed knitters should check the Sinker Plate to make sure that the brushes and
wheels are all spinning freely. If not, remove them and clean the sinker plate. If the
brushes are spiky, trim them. If the sinker plate has been dropped or bumped it
may be slightly distorted. The straightening is a job for your dealer, though.