DesignaKnit Garment/Japanese Notation
This format may seem cryptic to you, but the purpose of the Garment Notation, (also known as Japanese Notation) is to display abbreviated knitting instructions on a visual diagram of your garment piece.
These videos will help you make the best use of this printing format in DesignaKnit.
These videos will help you make the best use of this printing format in DesignaKnit.
DesignaKnit Garment (Japanese) Notation Format

DesignaKnit 8/9 Japanese Notation Formatting

Garment Notation Cheat Sheets

After creating garment designs in Standard Garment Styling or Original Pattern Drafting, you may choose to print out the knitting instructions in Garment Notation Format (also known as Japanese Notation).
Designaknit Garment Notation format can be very easy to follow when knitting. It places the instructions on a representation of the garment shape. Once you learn the "code" you'll find it very easy to knit from this style of instruction.
You can control the appearance of your instructions. Make your knitting instructions logical and clear for YOU. Not only align the instructions so they are easier to read, you change the "code" so it isn't so cryptic.
To make changes, select the Garment outline format. Then use the single or double wrench tool and play with the settings. Preview the pattern and see what format works best for your garment, gauge and preferences.
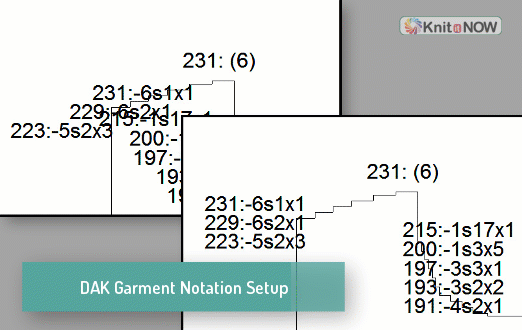
| An example of Japanese Notation: | r142:-1s 3r 26x |
| Translated: | Row 142: Decrease 1 stitch every 3 rows 26 times |
You can control the appearance of your instructions. Make your knitting instructions logical and clear for YOU. Not only align the instructions so they are easier to read, you change the "code" so it isn't so cryptic.
To make changes, select the Garment outline format. Then use the single or double wrench tool and play with the settings. Preview the pattern and see what format works best for your garment, gauge and preferences.