Double high repeats each row of your stitch pattern twice, making the design taller without changing its width. On punchcard machines, this is often called double length.
One stitch pattern, a different look. Double high repeats each pattern row twice, stretching the design vertically without changing its width. It’s a simple way to get more from the stitch patterns you already have.
Double high repeats each row of your stitch pattern twice, making the design taller without changing its width. On punchcard machines, this is often called double length.
Same stitch pattern, different proportions. Double high repeats each pattern row twice, making the elephant taller without making it wider.
Why This Works
Double high repeats each row of the stitch pattern twice before advancing to the next pattern row. This stretches the design vertically without changing the number of stitches across it.
Your machine may call this double high or double length.
Electronic machines may offer other variations, such as double width, mirror image, or reverse. Available options depend on your model.
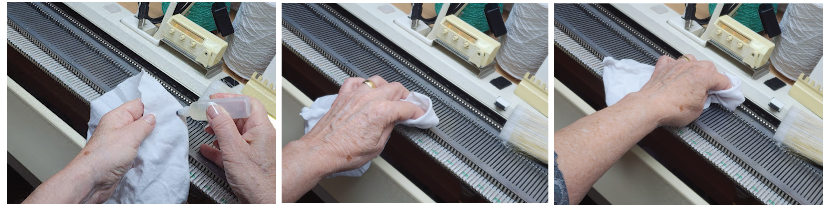
A little oil helps your knitting machine run smoothly. Too much can attract the very lint and dust you want to keep out.
Use petroleum-based sewing machine oil made from highly refined mineral oil, also called “white oil.”
Give your machine some love
Use oil sparingly. Follow your machine’s manual for the correct oiling locations.
Use a high-quality, petroleum-based sewing machine oil made from highly refined mineral oil. This is sometimes called “white oil,” although it is clear and colorless. Choose a product labeled for sewing machines.
Follow your knitting machine’s manual for where and how often to apply it.
Apply sparingly, as excess oil can attract dust, lint, and yarn fibers.
You don’t need to oil before every garment.
Follow the maintenance schedule in your manual, adjusting for how often you use your machine.
Try This
Avoid using standard WD-40 as a substitute for sewing machine oil.
Your size is a starting point. Your favorite sweater length is personal.
Your sweater should be the length you enjoy wearing. Our standard measurements give you a starting point. Check and adjust the garment length before creating your pattern.
A sweater you enjoy wearing is a useful guide to your preferred length.
Choose Your Length
Choosing a size doesn’t determine where you want your sweater to end.
You might prefer a cropped cardigan, an everyday hip-length sweater,
or a longer tunic.
Your Knit It Now Pattern Builder provides standard
starting measurements. Review the garment length and adjust it to
suit your style before creating your pattern.
What is a Pattern Builder?
A Pattern Builder creates personalized knitting instructions from
your chosen style, measurements, and gauge, with technique help
available as you knit.
Try This
Choose a few sweaters whose lengths you enjoy wearing.
Lay each sweater flat without stretching it.
Measure each sweater, noting your starting and ending points.
Record your favorite lengths with descriptions such as “cropped cardigan” or “everyday sweater.”
Check the builder’s measurement guide and enter your preferred length using the same measurement points.
Check the starting measurement and adjust the length to suit you.
Compare like measurements. Check the builder’s measurement guide, including whether the length includes the bottom band or hem.
Make It Yours
Create a Sweater in Your Favorite Length
Choose a Pattern Builder and personalize the measurements for your next project.
Stop fighting with complex stitches and start shaping like a pro.
All Machines
Forget hand-manipulation. Use Cut 'n Sew to secure your knitting with a sewing machine and cut the shape you need.
Why This Works
Shaping while knitting complex patterns like lace or Fair Isle is a recipe for dropped stitches and frustration. The Cut 'n Sew method lets you knit 'yardage' first, focusing entirely on your stitch pattern. Then, you use a sewing machine to secure the stitches and cut the exact shape you need. It’s the ultimate shortcut for perfect necklines and armholes.
Try This
Use an unneeded swatch and draw a curve on it with a pen
Give your necklines a boutique-quality finish that looks great on both sides.
All Machines
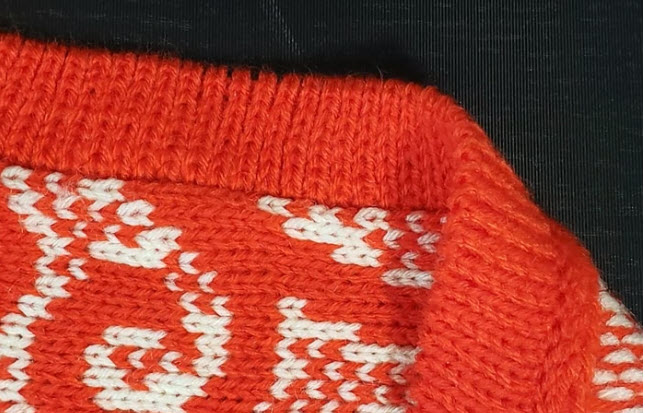
Encase the raw edge between two knitted layers for a clean, reversible finish - perfect for cut 'n sew.
About This Finish
This sandwich band finish (also known as an industrial band) creates a clean, professional edge by enclosing the stitches between two knitted layers. The result is smooth, polished, and looks beautiful on both sides.
It works whether you’re finishing a cut edge or a shaped edge - the goal is the same: completely hide the edge for a refined, finished look.
The secret to a professional result is graded tension - knitting the band slightly tighter at curves so it hugs the neckline without ruffling or flipping.
A little practice can help you finish your cardigan with confidence.
Choose your band style, then use its stitch gauge to calculate how many stitches to pick up along the cardigan edge. Practice the band, buttonhole, and joining method on a small sample first.
Tubular Band for a cardigan Front Opening
How Many Stitches Should You Pick Up?
The band needs to fit the edge without stretching it or adding extra fullness. When picking up the edge onto the machine, multiplying the edge length by the band’s stitch gauge gives you a starting stitch count. Use the band’s gauge, which may differ from your cardigan fabric.
Try This
Choose your band stitch pattern: ribbed, stockinette, or another pattern.
Knit a swatch to establish your band stitch gauge.
Use your garment swatch to test the pickup and band.
Measure the swatch edge where you’ll attach the band. Multiply that length by your band stitches per inch or cm to calculate how many stitches to pick up.
Pick up that number of stitches evenly along the swatch edge and knit your chosen band.
Check that the edge lies flat, without puckering or flaring. If it does, repeat the calculation and method along your garment edge.
Tubular band for cardigan edge
Pro Exercise (Optional):
Practice on a small piece of knitted fabric. Include a buttonhole and attach the band using your chosen method. Check whether the edge lies flat before working on your cardigan.
Band Pickup Calculator
How Many Stitches Do You Need?
Use your cardigan edge measurement and band stitch gauge to calculate a starting stitch count.
Your size is a starting point. Your favorite sweater length is personal.
Your sweater should be the length you enjoy wearing. Our standard measurements give you a starting point. Check and adjust the garment length before creating your pattern.
A sweater you enjoy wearing is a useful guide to your preferred length.
Choose Your Length
Choosing a size doesn’t determine where you want your sweater to end.
You might prefer a cropped cardigan, an everyday hip-length sweater,
or a longer tunic.
Your Knit It Now Pattern Builder provides standard
starting measurements. Review the garment length and adjust it to
suit your style before creating your pattern.
What is a Pattern Builder?
A Pattern Builder creates personalized knitting instructions from
your chosen style, measurements, and gauge, with technique help
available as you knit.
Try This
Choose a few sweaters whose lengths you enjoy wearing.
Lay each sweater flat without stretching it.
Measure each sweater, noting your starting and ending points.
Record your favorite lengths with descriptions such as “cropped cardigan” or “everyday sweater.”
Check the builder’s measurement guide and enter your preferred length using the same measurement points.
Check the starting measurement and adjust the length to suit you.
Compare like measurements. Check the builder’s measurement guide, including whether the length includes the bottom band or hem.
Make It Yours
Create a Sweater in Your Favorite Length
Choose a Pattern Builder and personalize the measurements for your next project.
Choose the direction that makes shaping and finishing easier for you.
Neither direction is inherently better. Choose based on whether you prefer increasing or decreasing, and how you want to finish the cuff.
Two directions, different advantages
Bottom-up: cuff to armhole
Start with the cuff and increase as you knit toward the upper arm. This familiar construction lets you work and finish the cuff at the beginning.
Top-down: armhole to cuff
Start with the widest part of the sleeve and decrease toward the wrist. Some machine knitters find decreasing faster and easier than increasing, making this approach appealing.
Neither direction is inherently better. Choose the shaping you prefer, with a plan for how you’ll finish the cuff.
Try This
With a top-down sleeve, choose your cuff finish and bind-off before you start. The finished cuff needs enough stretch to fit comfortably over your hand, along with the appearance you want.
One stitch pattern, a different look. Double high repeats each pattern row twice, stretching the design vertically without changing its width. It’s a simple way to get more from the stitch patterns you already have.
Double high repeats each row of your stitch pattern twice, making the design taller without changing its width. On punchcard machines, this is often called double length.
Same stitch pattern, different proportions. Double high repeats each pattern row twice, making the elephant taller without making it wider.
Why This Works
Double high repeats each row of the stitch pattern twice before advancing to the next pattern row. This stretches the design vertically without changing the number of stitches across it.
Your machine may call this double high or double length.
Electronic machines may offer other variations, such as double width, mirror image, or reverse. Available options depend on your model.
You can still knit the project you want - even with fewer needles.
All Machines
Adjust your yarn, stitch pattern, or construction method to create the required width without needing more needles
What's this about
Your machine width is fixed by needle count, but knitting width changes with gauge, yarn, and stitch pattern. Use the Maximum Knitted Width tool to see how wide you can knit with your gauge on your machine.
Try This
Quick Action Steps
Check your gauge and calculate the maximum width your machine can knit
Try a different yarn that gives fewer stitches per inch for more width
Use a wider stitch pattern like tuck or lace to increase fabric width
Split large pieces into multiple sections and seam them together
Add seams creatively (center, sides, or underarms) to maintain shaping
Consider sideways knitting for larger sizes without adding seams
You don't need yarn on cones to machine knit, but there are some good reasons you might prefer them.
No. You do not need yarn on cones to machine knit. Yarn from balls, skeins, cakes, or cones can all be used successfully. Cones are simply convenient, and many machine knitters prefer them.
Coned yarn comes in different weights and fibers. Choose yarn that's appropriate for your knitting machine and the fabric you want to create.
Coned Yarn Is a Choice, Not a Requirement
You don't need special yarn on cones to use a knitting machine. Yarn from balls, skeins, cakes, or cones can all be used successfully.
Many machine knitters prefer cones simply because they're convenient. A cone can contain a large amount of yarn, which means fewer joins when knitting larger projects, and the yarn can feed smoothly as you knit.
But don't choose a yarn just because it comes on a cone. The important consideration is whether the yarn is appropriate for your machine and for the fabric you want to create.
As always, swatch first. The same yarn may require different tension settings on different machines, and the fabric you create is more important than how the yarn was packaged. Prefer knitting from cones?
A yarn isn't suitable for your knitting machine simply because it comes on a cone. Choose yarn based on the yarn weight, your machine, and the fabric you want, and always swatch first.
Whether you’re using thicker yarn or creating an open, airy fabric, gauge is measured from the finished stitches, not the needles used.
Count stitches, not needles. Knit a generous swatch, let it rest overnight, block it as you’ll treat the finished project, then measure the actual stitches and rows.
Working every other needle gives stitches more room and can create either a heavier fabric or a light, open fabric, depending on the yarn and tension.
Why This Works
Knitting on every other needle changes the spacing between the stitches, but it does not change how you measure gauge. You might use every other needle to give thicker yarn more room or to create a lighter, more open fabric. If your swatch contains 50 stitches, count all 50 stitches, even though they are spread across every other needle. Once the fabric is off the machine, rested, and blocked, measure the marked stitches and rows in the finished fabric.
Try This
Bring 50 needles to work in an every-other-needle arrangement. This creates 50 stitches spread across 100 needle positions.
Knit several rows before beginning the section you will measure.
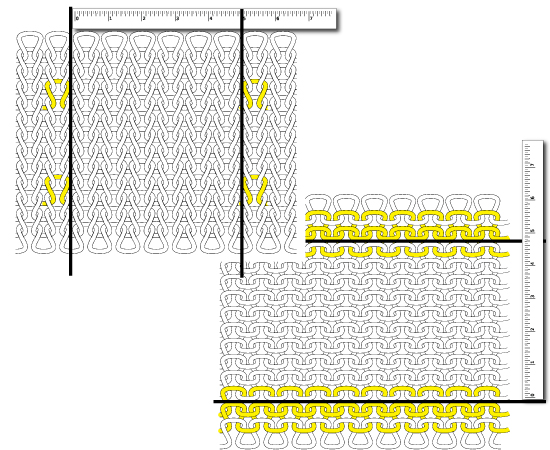
Place markers around a specific number of stitches and rows in the center of the swatch, away from the edges.
Knit several more rows after the marked section, then remove the swatch from the machine.
Let the swatch rest, then wash or block it exactly as you will treat the finished project.
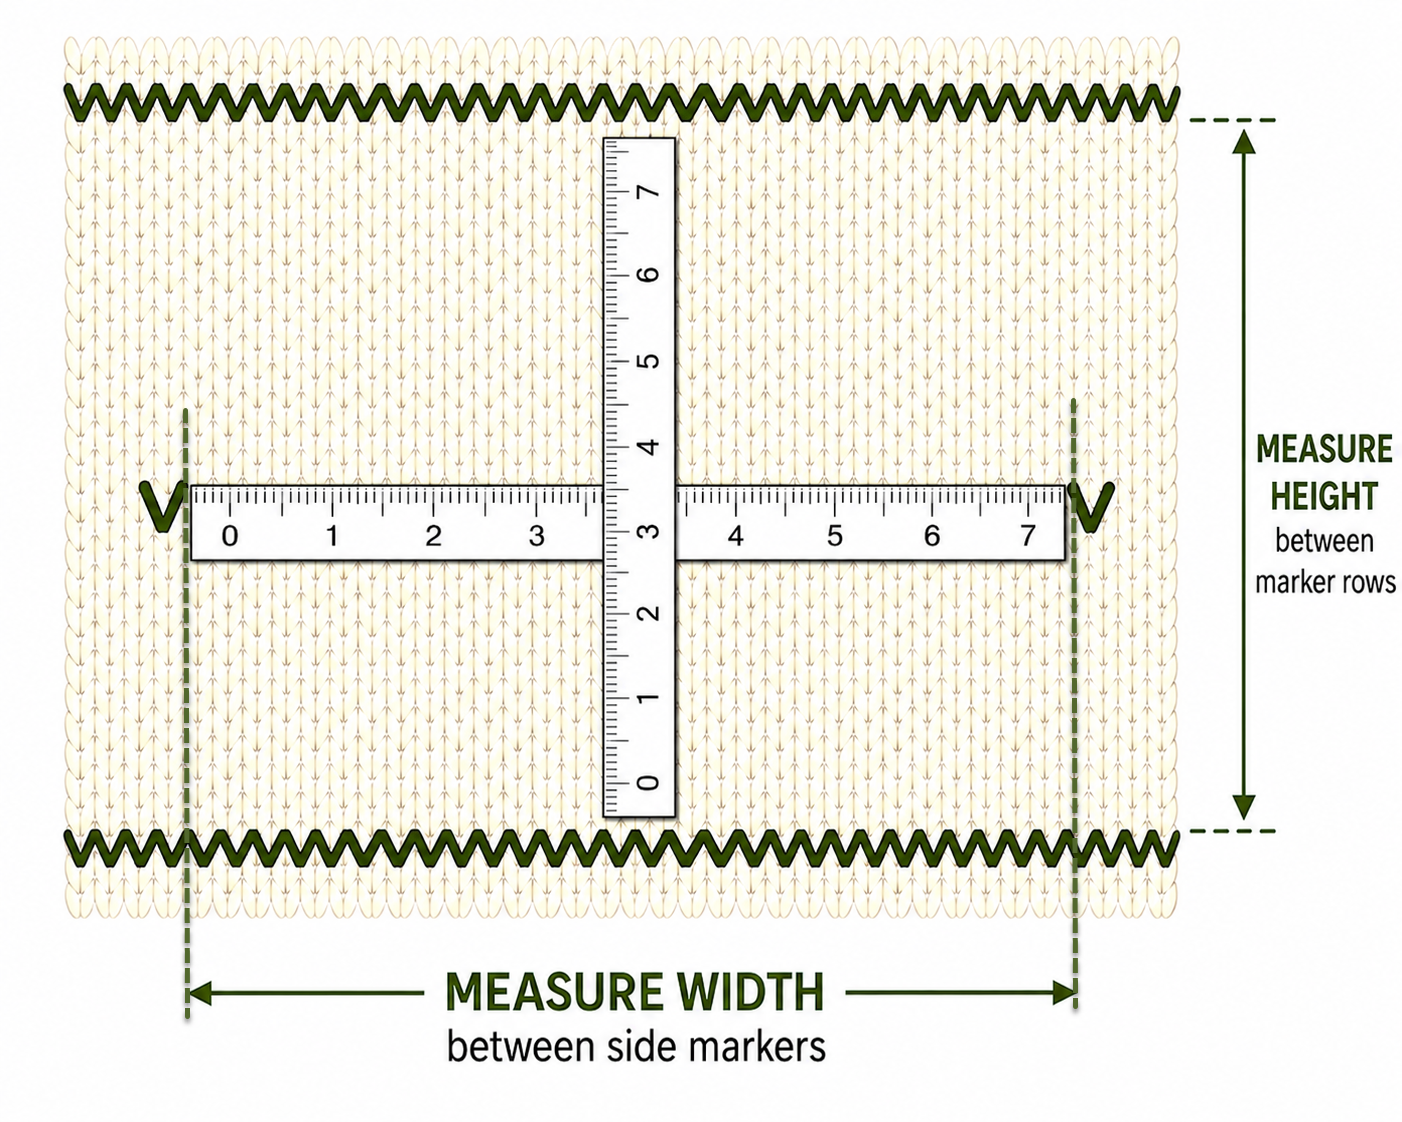
Measure the width between the side markers and the height between the row markers.
A few basic care habits can help you feel more confident about owning and using your machine.
You can learn routine care, including cleaning, lubrication, (see your manual) and checking needles and the sponge bar where applicable. If you need professional help, start with our Knitting Machine Repair Contacts and Services directory.
How Regular Care Helps
Removing lint and following your manual’s lubrication instructions helps keep the machine running smoothly. Worn needles or a deteriorated retaining sponge can affect how it knits. Regular care helps reduce problems, although wear, damage, and mechanical or electronic faults may still require repair.
Try This
Check your machine’s manual for cleaning and lubrication instructions.
Remove lint and yarn debris from accessible areas, and protect the machine from dust and moisture.
Check needle condition and the sponge bar or retaining system used by your model.
If the carriage becomes difficult to move, stop rather than forcing it. Check threading, settings, yarn suitability, and needle and sponge condition where applicable.
For persistent problems or visible damage, contact a repair provider. Confirm that they service your model, offer remote help or accept shipped machines, and have availability.
Before shipping, ask the provider what to send and how to pack it.
Use our directory to find providers to contact about your machine.
Repair list
A little oil helps your knitting machine run smoothly. Too much can attract the very lint and dust you want to keep out.
Use petroleum-based sewing machine oil made from highly refined mineral oil, also called “white oil.”
Give your machine some love
Use oil sparingly. Follow your machine’s manual for the correct oiling locations.
Use a high-quality, petroleum-based sewing machine oil made from highly refined mineral oil. This is sometimes called “white oil,” although it is clear and colorless. Choose a product labeled for sewing machines.
Follow your knitting machine’s manual for where and how often to apply it.
Apply sparingly, as excess oil can attract dust, lint, and yarn fibers.
You don’t need to oil before every garment.
Follow the maintenance schedule in your manual, adjusting for how often you use your machine.
Try This
Avoid using standard WD-40 as a substitute for sewing machine oil.
Stop searching for an LK150 pattern. Start with your gauge.
Any Knit It Now pattern works with any machine. YOUR gauge is what matters.
Your Pattern Is Based on Your Gauge, Not Your Machine
You don’t need a pattern written specifically for the LK150 (or your specific machine model). Knit and measure a swatch with your yarn, machine and stitch pattern, then enter your actual stitch and row gauge.
Knit It Now uses your gauge to create the pattern instructions for you. The same Knit It Now pattern can be used with any knitting machine.
Try This
Choose any Knit It Now pattern.
Knit a "PROPER" watch with your yarn on your machine.
Measure your gauge
Build your custom pattern with your stitch and row gauge.
Knit the pattern using your customized instructions.
Your Knit It Now pattern is created from your stitch and row gauge, not your machine model.
Even two knitters using the same machine and yarn may get different gauges. Always use your own swatch measurements.
This is a simple technique that opens up many of texture options
Works for: LK150
Use Russell levers and manual needle selection to hold stitches, build loops, and knit them off to create tuck texture
About Tuck Stitch on the LK150
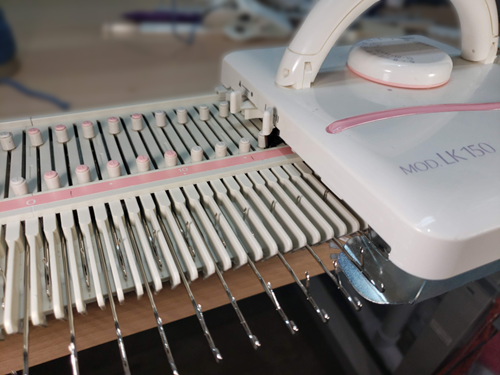
Tuck stitch on the LK150 is created by holding selected needles while the yarn floats OVER them. After a few passes, those loops are knit off to create texture. Since the LK150 has no punchcards or electronics, you control the stitch pattern entirely by which needles you select and how you use the Russell levers.
Browse the tuck stitch library: LK150-friendly tuck stitches.
Try This
Cast on 30 stitches and knit a few rows
Pull needles to D position according to the punchcard
Set both Russell levers to II
Knit 4 rows to build loops
Return both levers to I and knit 2 rows to release loops
Repeat this sequence a few times
Knit a few rows and bind off
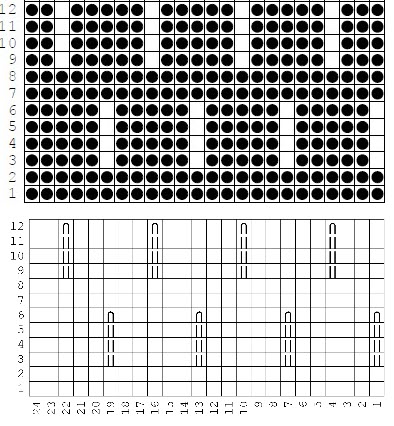
Example punchcard
White squares (no holes) will tuck ("D" position)
Holes will knit
Symbols will tuck ("D" position)
👉 Do not tuck edge stitches. Watch the loops build, then turn your swatch to choose your favorite side.
Slip stitch is one of the easiest ways to add texture and color without extra yarn or complicated techniques.
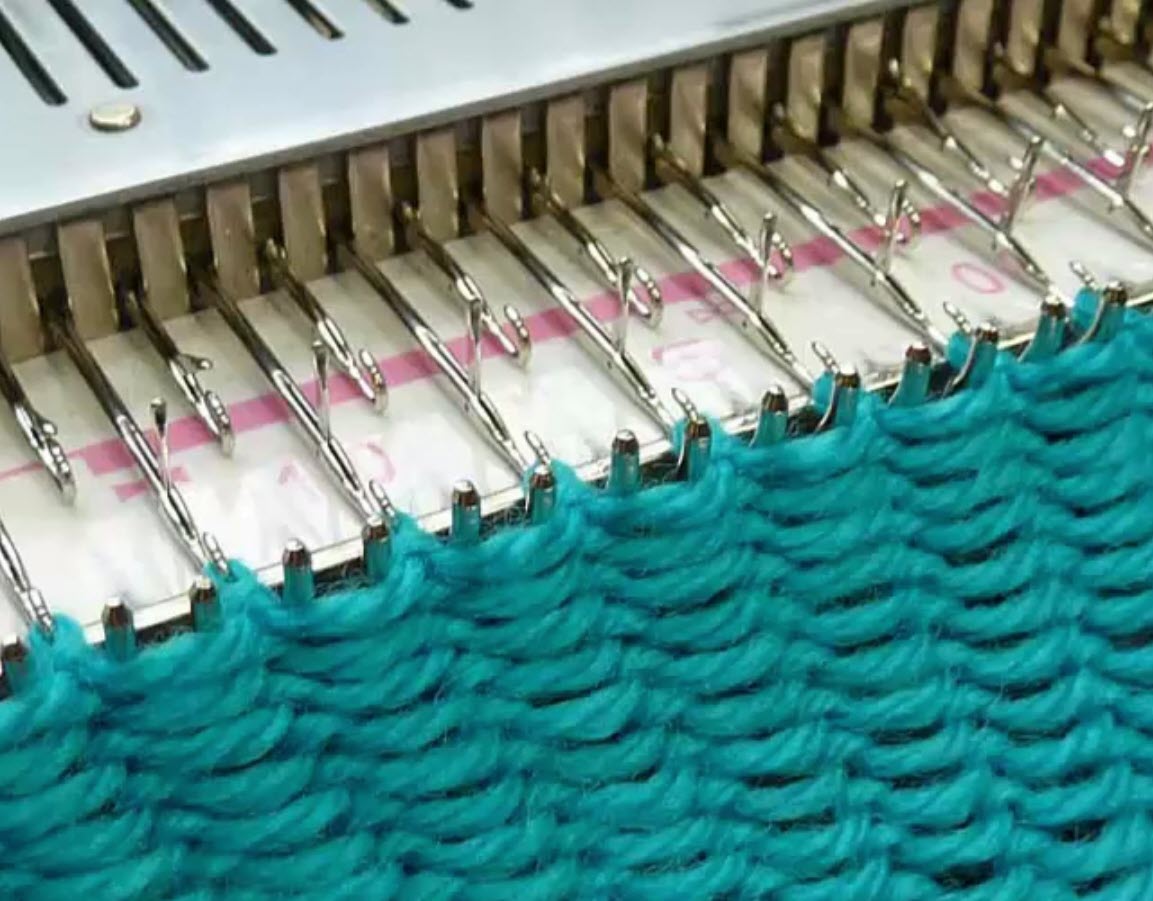
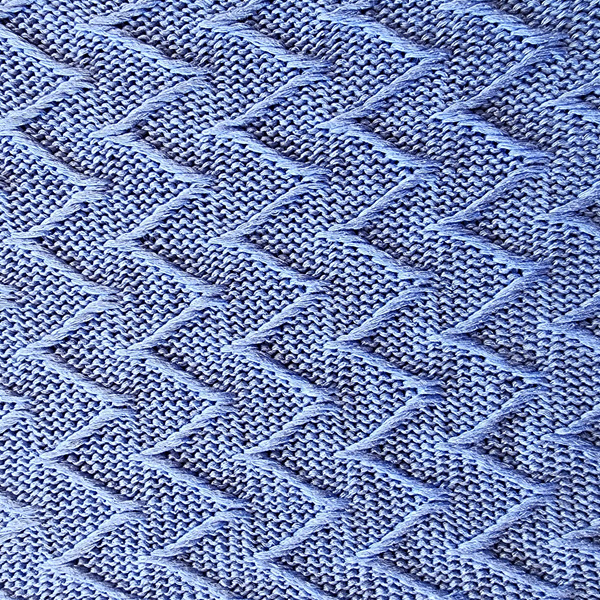
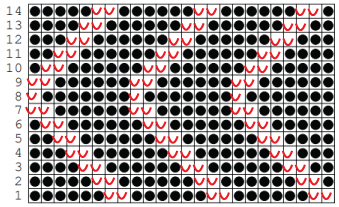
Slip stitch works by allowing selected needles to skip knitting. The yarn passes under those needles, creating a float on the purl side of the fabric.
About Slip Stitch on the LK150
Slip stitch works by allowing selected needles to skip knitting. The yarn passes under those needles, creating a float on the purl side of the fabric.
On the purl side, those floats stand out and create texture. On the knit side, the stitches appear elongated, adding subtle visual interest.
Slip stitch can be used for simple texture in one color or bold patterning in multiple colors. It works on the LK150 by hand selecting needles.


 New in the Help Hub
 Double high repeats each row of your stitch pattern twice, making the design taller without changing its width. On punchcard machines, this is often called double length.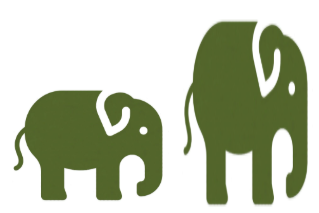




 (B) = SLIP